

Hello friends
It’s been awhile since I was last here … once again, life and work have got in the way of all my good blogging intentions.
A few weeks ago my yarn basket snuck into a few of my pics over on instagram and fb and requests for the pattern were made. I nearly didn’t post this as there are so many fab crochet basket patterns out there already but here is my version. Enjoy!

What you’ll need:
Hook: 5mm
Yarn: Worsted weight cotton – 2 strands held together
I’ve used one ball each of Drops Paris: Medium Pink, Shocking Pink, Light Mint Green, Opal Green, Light Purple, Medium Purple, Light Turquoise, Dark Turquoise, Orange
And 2 balls of Strong Yellow which was also used for the base
Size: 20 cm diameter x 26cm height
(You can make this basket any size you want by stopping when you are happy with the size then continuing on to the next set of directions and adjusting the stitch count to suit)
Abbreviations:
US Terms used (if you prefer UK/AUS terms just replace the sc with a dc throughout)
blo back loop only
ch chain
pm place marker
sc (dc) single crochet (double crochet)
ss slip stitch
st/s stitch/es
Special techniques and stitches:
- Standing sc (tutorial can be found in my post over here )
- Invisible join
- Crab st
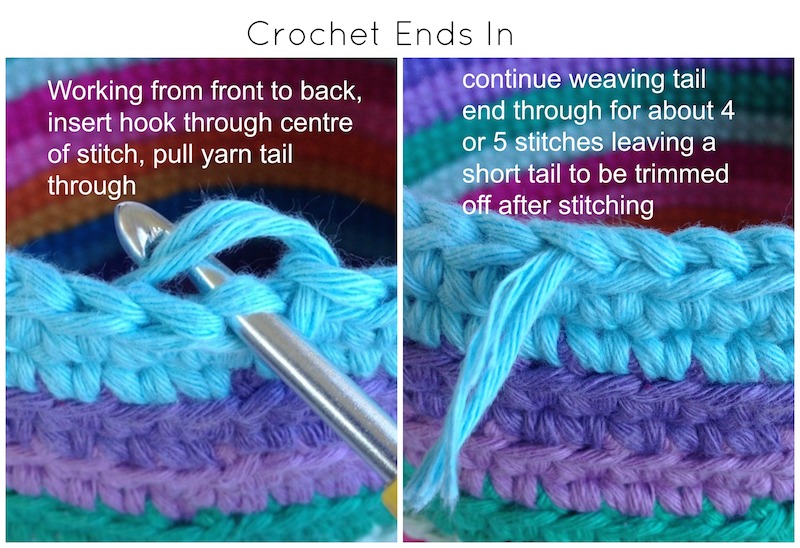
- Crochet ends in

1. Cut yarn and pull through last stitch
2. Insert your hook front to back under both loops of next st (first st of round), tail end over hook and pull through st
3. Working from back to front, insert hook through the centre of the previous stitch (last st of round),
4. tail end over hook and pull through st
To secure the join, crochet the tail end in working in the opposite direction you have just been. Your tail end will be locked in after you have woven them in this way and then crochet over them in the next round.
Okey dokey, now we’ve got all that sorted let’s start making!
Base:
Worked in a spiral i.e. don’t join with a ss at end of each row, but continue on with a sc into next st and place a marker in this st
Note: to keep your circle nice and round, the increases are staggered in alternate rows
Base Round: Using 2 strands of Strong Yellow, make a magic circle (or ch 3 and join with a ss)
Round 1: 6 sc into ring.
Round 2: 2 sc into each st to end (12 sc)
Round 3: *1 sc, 2 sc into next st. Repeat from * to end (18 sc)
Round 4: 1 sc, * 2 sc into next st, 2 sc. Repeat from * to last st, 1 sc (24 sc)
Round 5: *3 sc, 2 sc into next st.. Repeat from * to end (30 sc)
Round 6: 2 sc, * 2 sc into next st, 4 sc. Repeat from * to last 2 sts, 2 sc (36 sc)
Round 7: *5 sc, 2 sc into next st.. Repeat from * to end (42 sc)
Round 8: 3 sc, * 2 sc into next st, 6 sc. Repeat from * to last 3 sts, 3 sc (48 sc)
Round 9: *7 sc, 2 sc into next st.. Repeat from * to end (54 sc)
Round 10: 4 sc, * 2 sc into next st, 8 sc. Repeat from * to last 4 sts, 4 sc (60 sc)
Round 11: *9 sc, 2 sc into next st.. Repeat from * to end (66 sc)
Round 12: 5 sc, * 2 sc into next st, 10 sc. Repeat from * to last 5 sts, 5 sc (72 sc)
Round 13: *11 sc, 2 sc into next st.. Repeat from * to end (78 sc)
Round 14: 6 sc, * 2 sc into next st, 12 sc. Repeat from * to last 6 sts, 6 sc (84 sc)
Round 15: *13 sc, 2 sc into next st.. Repeat from * to end (90 sc). Finish with invisible join. Fasten off.
Sides:
Note: All colour change rounds are worked into the back loop only (blo) and the second row of the same colour is worked into both loops as normal.
I’ve used the following colour sequence (bottom to top):
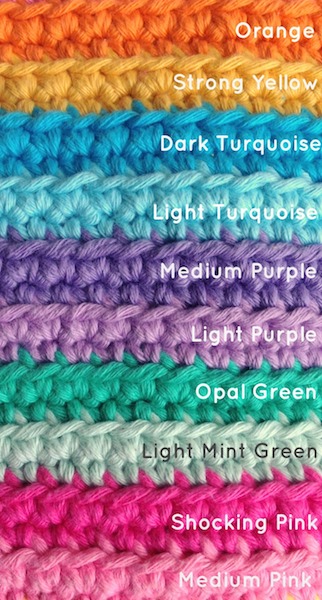
Once you’ve used all your colours, repeat the sequence (almost) once again … I’ve stopped at Dark Turquoise the second time around and continued on in this colour to complete the handles
Round 1: Join Medium Pink with a standing sc , working into the blo, sc 90
Round 2: PM in first st, sc 90. Cut yarn, finish with invisible join and crochet ends in.
Rounds 3–36: Repeat Rounds 1 & 2, changing colour every 3rd round.
Round 37: PM in first st, sc 15, ch 15, skip next 15 sts, sc 30, ch 15, skip next 15 sts, sc 15
Round 38: PM in first st, sc 15, sc 15 over chain handles, sc 30, sc 15 over chain handles, sc 15
Round 39: PM sc 90. Cut yarn, join with invisible join and weave ends in.
Round 40: Using only one strand, rejoin yarn in either the same colour or a contrast colour if you prefer. Work in Crab Stitch to end (see below for instructions)
How to: Crab Stitch (Reverse Single Crochet)
This stitch is worked the same as a single crochet but is worked from left to right instead.
- Chain 1 for the start of the row
- Insert hook in first stitch on the right
- Yarn over hook
- Pull through stitch (2 loops on hook)
- Yarn over and pull through both loops
- Insert hook in next stitch on the right and continue from step 3 onwards

My original version of the basket. This one is shorter and wider than the above pattern. It was also made using only one strand of yarn so it’s floppier than the new and improved version.
Until next time, happy hooking!
Michelle x

Such pretty colors & photos, and great tutorial. Thanks for taking the time to write it down and so freely sharing it!
Thank you so much for stopping by to comment 🙂 I hope you enjoy making a basket for yourself
Reblogged this on All Free Crochet And Knitting Patterns and commented:
So colorful and cheerful!! I love this! Enjoy 🙂
my daughter sent me this bag post I made some for her and her friends. Thank you for the pattern, the new stiches, and the video. I enjoyed making them.
That’s great to hear Elaine! I’m so glad you enjoyed making the bag 🙂
Can’t seem to print th bag pattern of
Hi Joyce, unfortunately I don’t have a printable version available but you can copy & paste into a word document if you’d like to print
Hi, do you start each colour above the previous start point or do you move the start positions on each colour change
Hi Vanessa, I do move my start point for each colour by a couple a stitches each time.
Why do you do this? I’m making the basket now. Love it. But I didn’t see this commet until now.
Lynn, I start at a different position to spread out the starting point which can leave a visible line if each row is started at the same point. It doesn’t matter if you haven’t done this though.
Makes sense. I will post a picture in revelry. I love the standing sc and the invisible join. I can use these in any pattern, right? The colors in this basket are helping me through a Michigan winter. Enjoy your Aussie summer☺
I might give this a try. It’s been a long time I crochet. Thanks for sharing.
This is so Springy and so Happy looking! I love it 🙂 Thank you so much for sharing 😀
Pingback: Free Pattern – Crochet Rainbow Basket – Crochet
Pingback: Crochet Basket DIY | lovecrochetpatternlinks
Pingback: Bountiful Baskets Pattern Compilation - Cre8tion Crochet
Pingback: The return of Friday Finds – a list of 7 free patterns for crocheted baskets | a little bird made me
This bag is adorable.
Pingback: Crochet Bags Tutorial - Shelley Husband Crochet